Sunday, December 26, 2010
Belly Slider Update
Got out on Christmas day with my son for a surf. It was sunny and waist to chest high with some bigger sets. I lost one of my vent plugs and ended up taking out the new belly board. I was not sure how the pintail would work on such a small board, but it is really great! Compared to the straight-sided tombstone belly boards, it is very loose and turns early on the face. On bigger waves, I found I could carve up and down, just about hitting the lip. It was very fun, more so than the tombstone types because of the manuverability. The little bonzers do a good job, but really, to hang on in a steep section, I found I needed to really dig the rail into the wave face to keep from skidding off the wave. It is a little slower that the tombstone type, but I got more rides right in the pocket and better barrels, so for my local beach break, it seems better. And it is a little easier getting into waves and catching them earlier, given its wider width. Overall, super fun for a variety of smallish conditions and a great break from conventional standup riding. Definately be making some more!
Wednesday, December 15, 2010
New Belly Slider
I was recently cruising my favorite surf sites and ran across a really neat looking wood belly board. As a shaper, I'm not above taking inspiration from other designs. The shape is unusual, I think, because of the pin tail on such a short board. This one I found also had some neat turned down rails near the tail to act as little fins. Pretty cool. Of course I got all excited because I like belly boards, and ran down to the garage to see if there was anything lying around I could use to make one. Yes, there was! I cut down and reshaped an old 6 foot alaia that did not work too well. I wanted to do the turned down edges, but end up recycling some old bonzer-style fins I found in the bottom of the old fin box. Alot less work, and probably more effective. Maybe. I think it looks pretty cool. It's about 4'7" long and about 20" wide. We'll have to see how it works in the water!


710 Finished
Finally got some pictures of the new board to post. I've ridden this board for the last 2 weeks in surf from 2 feet to about 5 feet and I'm learning how to really enjoy it. I've learned to stay on the tail so I can use my weight to drive off the bottom and really how to pump across the wave face. Trim in only a short step forward and really it can be ridden is juicy surf without moving the feet at all...something new to my longboard style. I have found it to be very fast, super loose and turny and easy to paddle. The low rocker is not a problem on late drops. I can now make sections that before would have taken me out. I think the extra rake on the fin gives the board a little extra drive out of the bottom turn, because when done smoothly, I can really feel the board accelerate back up the face. So I'm pretty stoked with the performance of it. Eddie of Island Influence told me his old-school shaper's forumla for placement of a fixed fin. Definitely works Eddie!


Wednesday, December 1, 2010
Nice

This was my reward for surfing solo at sunset in epic ankle high surf. Gotta love out December days!
Saturday, November 27, 2010

Saturday, November 6, 2010
710 Getting Closer...
This board has come together pretty quick and I think it's going to be a nice one.

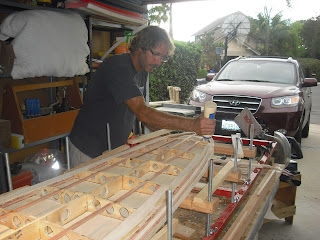


Layout on the left, work on the right

Gluin'....

Laminated ply and redwood core fin

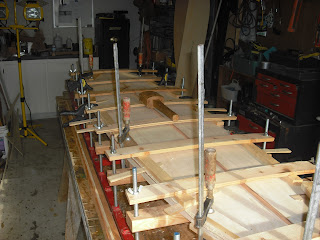
All clamped up!
Tuesday, November 2, 2010

710 Single Fin
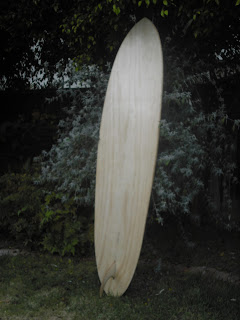
My head was full of so many ideas while working on the ugly stick that I started a layout for a new board after getting the ugly stick in the water. This will be a 7' 10" single fin, egg shape with a pintail. The rocker will be lowish, maximum width of 21.5", a 16" nose and a 15" tail, 2-3/4" thick, but no super fat rails on this one! Oh no. Son Andy is helping with this one and it will be his board (maybe!). Here are a few picutures so far.


Here is my layout of the keel on a ply sheet. I like to use battens to make fair curves. I start with the top of the board curve and then add the desired thickness at each rib station. I space ribs at 8" on center. When the curves look good and fair, I subtract the skin thickness for the top and bottom and cut out the keel from the plywood.

Nose to tail view.

Here is the nose blocking, final shaped. When the top is installed, I'll have the finished shape of the nose and tail already, so there is no guess work or redoing the layout. Then I just have to fair the rails inbetween.

Pintail. Nice! Still need to install blocking for the fin and tail.

Using Bobby's hand plane for the bottom of the nose curve!
Monday, October 25, 2010

Thursday, October 21, 2010
Ugly Stick Completed!
With the onset of rains, cooler weather and continued work, the glassing and finish process was slowed down a bit. So here it is.


8-6 x 22.5 x 16.5 x 15 x 2 7/8

The tint on the bottom tail is cedar dust from the belt sander bag!


Crazy thick rails, I know. At least my knees will stay dry.


That's it. I'll try and post a few action shots in the near future.
Tuesday, October 12, 2010
Ugly Stick 6 - Nearly Ready
Tuesdays update....

Here is the high-tech jig for routing out the fin dados. Never though I'd use the old plunge router again!

First dado cut without mishap and along the intended line.

The fin is glued in the slot with a 4 degree cant. The rears got a 3 degree cant.

Fins on. Hooray!

The fins will get more resin and shaping on the board now.

My signature epoxy leash loop glued onto the laminated top. It will get several coats of resin along with the deck and become nice and clear.

The tail block after the top lamination. There is not enough curve in the top to get the effect I was hoping for, but it looks nice anyway. Originally it was a square tail, but Rick March got me excited about a swallow tail, so here it is.

Son Andy shaping/attaching/finishing a set of plywood fins for his fish. Nice job Andy! Hey, don't break those fins.
Sunday, October 10, 2010
Plywood Stick 5 - aka The Ugly Stick

Here is a pictoral update on the board's progress. Here the rails strips are all installed and the upper strips have been sanded flat to accept the deck.

The deck has been glued on and rough planed down to shape.

Another view of the newly installed deck. I'm not happy with the shape of the ribs near the front...you can see in the lower left part of the picture where the curve of the deck edge pulls closer to the center line of the board, exposing more of the rail strips. This is because I put a little too much curve on the ribs, interrupting the fair line of the deck. Oh well!
So after looking at the board with the deck on, reailzed it was a mistake to not put a crown on the deck. As it is, the deck is completely flat and the thickness is carried out to the top of the rail. I've never done a totally flat deck and I probably should have anticipated this issue. So the board has these massive rails that kinda look like 1970's down rails, hence the new moniker.

Lamination Day. Hey everyone laminates in their front yard, don't they? Finally got a few days warm enough to start glassing. I did this board in one layer of 6 ounce top and bottom. All my other boards have been done in 4 ounce. I had to repair an older board done in 4 ounce, that required stripping of all the glass work. Once off, I could not believe how thin the resin and cloth section was! I mean, if I wanted to know it's thickness, I'd have to use a micrometer. Crazy. By the way, I have been using epoxy resin form John Greer in San Diego. I''ve had very good results with it and the best part is it shows up at my door one day after ordering it!

Leading fins. The fins were shaped from 1/4 plywood scraps from the skins. I laminated them with 2 layers of 6 ounce on each side, which makes them plenty stiff. I'm going to route a 7/16" wide dado into the board, 1/2" deep. The fin will be glued in with 5-minute epoxy then the remaining space filled with resin. This way, I don't have to do 'footballs' or use fin rope and spend time messing with that. If I ever do break a fin, I'll just sand flush, route through the old base and epoxy, and glue in a new one. Easy.
Tuesday, September 28, 2010
Plywood Stick 4

Finally off the rocker table and planing down the top rails in preparation for placing the top. I generally like to do this with hand tools, but I went all power this time, using the Bosch power planer and the amazing belt sander. Very fast, but of course, it is super noisy and messy. Also, at this point I rough out the bottom rails, especially in the nose where the rail will be fairly soft.

Back on the table, all ready for the top. Final check to make sure the top will lay fair across all ribs and especially at the nose and tail. The tail need some additional blocking in this picture.

The top is finally on, glued with Titebond III. This part is best done with a helper, or at least a third hand.

More PVC clamps in between the wood clamps. I also used a few shims driven under the wood clamps. A convex deck would have required more elaborate clamping along the rail top to get the top to curve.
Sunday, September 26, 2010
Plywood Stick 3

Finally done adding wood to the tail block. Now it is wide enough for the subtail.

Here are the rough nose blocks sitting in place. They are cedar with a thin strip of redwood in the middle for a little contrast. They'll get glued on after the top skin is in place.

Bead and cove rail strip progress. Nearly done. With a totally flat deck, I don't have to carry the strips too far onto the deck. Another 4 strips should do it. Okay, for the observant, how many mistakes/fixes can you spot in this photo? I can see at least two that I know of!

I decided to go with a quad set up for a couple of reasons. Quads seem like having little motors under the board when you turn, and I wanted some shallow draft fins for suring the reef on low tide or inside days. These are made from plywood leftovers from the skins and they'll get inset 1/2" into the board to simplify installation.

Another picture of the progress so far. Gee, how come the top-of-rib stringers are so wiggly? Apparently there was a technical measurement issue in laying out the center line of the ribs. Time for a new ruler I guess.
Saturday, September 25, 2010
Plywood Stick, 2


Here is the chine strip. This one is a half inch wide to allow for a pretty soft rail in front of the board. The notch in the top of the rib is for a longitudinal stringer for additional deck support and gluing area.

The starter rail strip is glued on and clamped with PVC clamps. Plastic does have its uses.

Here is the tail block all cut and ready to reglue. It is alternating pine and redwood.

So here is the tail block reglued in a little wavy pattern. When the block gets shaped with top and bottom curved surfaces, the redwood rectangles will become curved like beans and should make a pretty cool pattern. At least I hope!
Subscribe to:
Posts (Atom)